Today, It was time to finally fasten my rudder pedals to the chair. I wanted to feel some tension against my feet as I pushed against them, as well as them springing back to its normal position. For this I bought a 200mm Gate Spring. I welded it next to the rudder pedal on the steel frame. It turned out to be too strong! I couldn't push against it, I was pushing so hard that the nail actually tore the soft rudder pedal metal.
I tried stretching the string, but that didn't work either. Back to the drawing board for me! Cause I'm totally stuck for Ideas.
Sunday, May 18, 2008
Wednesday, May 14, 2008
Display.
 For display, I only wanted something Cheap, and whats cheaper than free? I acquired these monitors from a local school, But they were old. And I mean, old. They were dirty, They were faded yellow, They had some broken and some missing stands. So I decided these required a make over. I took the monitors to bits, and Cleaned off all the dust and built up dirt in the shower. I then let them thoroughly dry out, because any moisture = bad paint job. after that, I didn't bother with primer, I just went straight onto spraying them a satin black. Got through three cans to do all 4 monitors (one spare). Overall, I'm happy with them. Once I get my flight simulator fully set up, it will be then I decide to upgrade parts of it. But for now, these will do fine.
Rudder Pedals.
 Here are the rudder pedals that I bought off eBay for £23.25 with P&P. They have hydraulic arms for the toe breaks already fitted, So I need to somehow make the actual rudders go backwards and forwards. I was thinking maybe a small shock absorber of something like a minimoto, or some other sort of spring. I was going to use some exercise machine dampers.. But I decided that they were to strong to push against for rudder pedals, and they didn't give the necessary spring backwards.
Harness Makeover.
 Okay, So I bought an old aeroplane harness buckle with connectors off my good friend Geremy for £20, with some old Land Rover seat belts glued to it. First thing I did was rip the seat belts off, then got on with taking the harness to bits. It was very scratched and old, and had stickers peeling off it. I took the back off to find a huge amount of dirt and dried up grease, along with four ball bearings. I put them in a jar along with the nut and bolt that held it together. I cleaned the inside with lighter petrol and a tooth brush, then got on with spraying it. I gave it a light sand, as well as etching all the stickers and dirt off with petrol again, then sprayed it in red primer. After leaving that overnight to dry, I sprayed it in some left over red gloss.
After re-greasing it, I put it back together, and was wowed with the results!
Chair Updated!

Now you can see how I didn't really stick to my plans. I'm not a planning sort of person, I can plan things, but If I think it would look better a different way, that doesn't mean I'll drop everything and go back to the drawing board, I'll just adapt on the way, and I think thats one of the things that will make this project great.
The holes in the side are not only for carrying by, they are for threading the harness through, which will be fastened to the bottom corners of the seat.
If you are familiar with the Spitfire seats, You will know that the base of the seat is slightly bucket shaped. The best way I could reproduce this was to round the back into the base and a bump at the front. I tried steaming the MDF, but it only wanted to go one way, Up. I think though this gives a bucket feel when you sit in it, and will look alot smoother when I cover it in Aluminium. You can see the steel pipe that the Rudder pedals will be bolted to on the outsides.
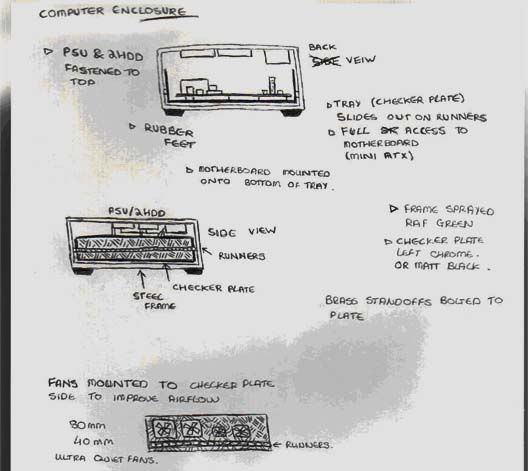
Here you can see the spacious PC Enclosure, along with its drawer runners that are simply pot-riveted to the frame. You can also see here why I was a week on welding, grinding, sanding and polishing the old rusty box-pipe. I got it to clean up fairly well.

A Brief Explanation.
Okay, so my Plans for building are:
To start from the seat, and attach everything on to it; Simply by welding 1" steel square pipe to the seat, and then slotting in 1/2" pipe and bolting it in place. This makes it easy for disassembling in-case of transport. I was going to buy a "Whitley Bomber" Seat off ebay, a plane that was around that era. But, as it was going for a high price, I decided to replicate my own spitfire seat, out of wood, and then coated in sheet aluminium, to give it that.. Tinny feel.
In order of building.. I'm going to build:
Seat -> Rudder pedals -> Trim wheel -> Controls -> Chassis lever -> Blind flying panel -> Then a shell to hold it all in.
Here are some simple plans a drew up, Not brilliant, and the final version is slightly modified from them, but you get the idea..
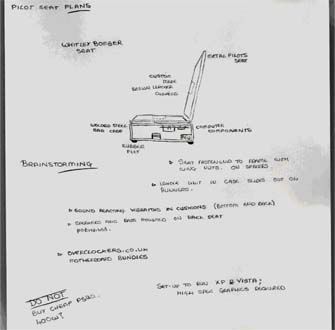
I know the Images are not brilliant.
Basically, I've built a PC enclosure underneath my Pilots seat, to keep everything compact and organized. The seat is going to be the core of the whole sim; Everything will attach to it and everything will run from it. The PC enclosure basically is a steel frame, with a Checker plate tray on runners, on which I will mount my motherboard, HDDs & PSU. On each sides of the tray holes will be cut all the way through the seat and fans will be mounted. Not drawn on the plans, but still included, a "ButtKicker" Will be installed. Basically, all this is is a compact device that converts sound to vibrations, e.g The harder the sound, the harder the vibrations. To give you a true feeling that your actually flying the plane. There will only be one cushion on the seat now and that will act as a head rest. I will custom-make it out of leather, with foam stitched in strips.
To start from the seat, and attach everything on to it; Simply by welding 1" steel square pipe to the seat, and then slotting in 1/2" pipe and bolting it in place. This makes it easy for disassembling in-case of transport. I was going to buy a "Whitley Bomber" Seat off ebay, a plane that was around that era. But, as it was going for a high price, I decided to replicate my own spitfire seat, out of wood, and then coated in sheet aluminium, to give it that.. Tinny feel.
In order of building.. I'm going to build:
Seat -> Rudder pedals -> Trim wheel -> Controls -> Chassis lever -> Blind flying panel -> Then a shell to hold it all in.
Here are some simple plans a drew up, Not brilliant, and the final version is slightly modified from them, but you get the idea..


I know the Images are not brilliant.
Basically, I've built a PC enclosure underneath my Pilots seat, to keep everything compact and organized. The seat is going to be the core of the whole sim; Everything will attach to it and everything will run from it. The PC enclosure basically is a steel frame, with a Checker plate tray on runners, on which I will mount my motherboard, HDDs & PSU. On each sides of the tray holes will be cut all the way through the seat and fans will be mounted. Not drawn on the plans, but still included, a "ButtKicker" Will be installed. Basically, all this is is a compact device that converts sound to vibrations, e.g The harder the sound, the harder the vibrations. To give you a true feeling that your actually flying the plane. There will only be one cushion on the seat now and that will act as a head rest. I will custom-make it out of leather, with foam stitched in strips.
Aims and Objectives.
Aims and Objectives
> To build a realistic Flight Simulator cockpit that resembles a Spitfire Mk IX.
> All features should function, Including controls and gauges.
> To build at low budget.
> To run the Simulator through Microsoft Flight Simulator 2004 with a Spitfire Add-on.
I’ve been building for the past week or so now, and have only just decided to keep track of my progress via a blog. I’ve already done a little bit of work to the seat and rudder pedals. (I’ve welded a frame for the seat and I’ve welded two bars at the front on which to mount the rudder pedals)
This flight simulator is a huge learning curve for me. As you will see the flight simulator progress, you will see the standard of my work also progress.
I’ll try keep updated with photos and other media as much as I possibly can.
Subscribe to:
Posts (Atom)